MyISAM 和 InnoDB 存储引擎区别及各自使用场景

InnoDB 主要优势

  • 事务支持:事务提交回滚以及错误恢复。
  • 行级锁
  • 聚合索引
  • 外键支持

InnoDB 在 MySQL 5.6.4 后支持全文索引。

MySQL 5.5 后默认存储引擎为InnoDb。

如果不能使用到索引,行级锁会失效。

如何选择两种存储引擎

大量读,几乎没有写请求 和 小于5.6.4版本需要全文索引,选择 MyISAM,其他情况选择InnoDB。

我的性能测试结果,仅供参考

CREATE TABLE `engine_t1` (
  `id` int(11) unsigned NOT NULL AUTO_INCREMENT,
  PRIMARY KEY (`id`)
) ENGINE=InnoDB DEFAULT CHARSET=utf8;

单进程插入10万条记录,MyISAM 1.8348009586334 秒, InnoDB 2.0098528862 秒

6个进程同时各插入10万条记录,MyISAM 3.860533952713 秒, InnoDB 2.9386329650879 秒(每个进程运行时间差不多,文章中给出的是其中一进程的运行时间,下同)

12个进程同时各插入10万条记录,MyISAM 7.4965870380402 秒, InnoDB 5.0007991790771 秒

CREATE TABLE `wp_posts_1` (
  `ID` bigint(20) unsigned NOT NULL AUTO_INCREMENT,
  `post_author` bigint(20) unsigned NOT NULL DEFAULT '0',
  `post_date` datetime NOT NULL DEFAULT '0000-00-00 00:00:00',
  `post_date_gmt` datetime NOT NULL DEFAULT '0000-00-00 00:00:00',
  `post_content` longtext COLLATE utf8mb4_unicode_ci NOT NULL,
  `post_title` text COLLATE utf8mb4_unicode_ci NOT NULL,
  `post_excerpt` text COLLATE utf8mb4_unicode_ci NOT NULL,
  `post_status` varchar(20) COLLATE utf8mb4_unicode_ci NOT NULL DEFAULT 'publish',
  `comment_status` varchar(20) COLLATE utf8mb4_unicode_ci NOT NULL DEFAULT 'open',
  `ping_status` varchar(20) COLLATE utf8mb4_unicode_ci NOT NULL DEFAULT 'open',
  `post_password` varchar(255) COLLATE utf8mb4_unicode_ci NOT NULL DEFAULT '',
  `post_name` varchar(200) COLLATE utf8mb4_unicode_ci NOT NULL DEFAULT '',
  `to_ping` text COLLATE utf8mb4_unicode_ci NOT NULL,
  `pinged` text COLLATE utf8mb4_unicode_ci NOT NULL,
  `post_modified` datetime NOT NULL DEFAULT '0000-00-00 00:00:00',
  `post_modified_gmt` datetime NOT NULL DEFAULT '0000-00-00 00:00:00',
  `post_content_filtered` longtext COLLATE utf8mb4_unicode_ci NOT NULL,
  `post_parent` bigint(20) unsigned NOT NULL DEFAULT '0',
  `guid` varchar(255) COLLATE utf8mb4_unicode_ci NOT NULL DEFAULT '',
  `menu_order` int(11) NOT NULL DEFAULT '0',
  `post_type` varchar(20) COLLATE utf8mb4_unicode_ci NOT NULL DEFAULT 'post',
  `post_mime_type` varchar(100) COLLATE utf8mb4_unicode_ci NOT NULL DEFAULT '',
  `comment_count` bigint(20) NOT NULL DEFAULT '0',
  PRIMARY KEY (`ID`),
  KEY `post_name` (`post_name`(191)),
  KEY `type_status_date` (`post_type`,`post_status`,`post_date`,`ID`),
  KEY `post_parent` (`post_parent`),
  KEY `post_author` (`post_author`)
) ENGINE=InnoDB DEFAULT CHARSET=utf8mb4 COLLATE=utf8mb4_unicode_ci;

单进程插入1万条记录,MyISAM 4.3874440193176 秒, InnoDB 3.8677229881287 秒

6个进程同时各插入1万条记录,MyISAM 9.7532279491425 秒, InnoDB 6.4886889457703 秒(平均每个进程运行时间)

12个进程同时各插入1万条记录,MyISAM 22.401536941528 秒, InnoDB 8.3166329860687 秒(平均每个进程运行时间)

12个进程同时主键SELECT1万次,MyISAM 3.3773090839386 秒, InnoDB 3.3466641902924 秒(平均每个进程运行时间)

30个进程同时主键SELECT1万次,MyISAM 8.7141139507294 秒, InnoDB 8.6588280200958 秒(平均每个进程运行时间)

总结:从这个测试结果来看,InnoDB几乎是完胜啊。(结果仅供参考,或许完全没有参考价值,毕竟与真实业务中的查询情况相差巨大)
Incorrect key file for table ‘xxx’; try to repair it

2017-04-21 01:29:34 7f1d8c0bd700 InnoDB: Error: Write to file (merge) failed at offset 2095054848.
InnoDB: 1048576 bytes should have been written, only 978944 were written.
InnoDB: Operating system error number 28.
InnoDB: Check that your OS and file system support files of this size.
InnoDB: Check also that the disk is not full or a disk quota exceeded.
InnoDB: Error number 28 means ‘No space left on device’.
InnoDB: Some operating system error numbers are described at
InnoDB: http://dev.mysql.com/doc/refman/5.6/en/operating-system-error-codes.html
2017-04-21 01:29:35 93551 [ERROR] Slave SQL: Worker 7 failed executing transaction ” at master log mysql-bin.001470, end_log_pos 931467087; Error ‘Incorrect key file for table ‘xxx’; try to repair it’ on query. Default database: ‘xxx’. Query: ‘ALTER TABLE xxx ADD xxx TINYINT(3) DEFAULT ‘0’ NOT NULL’, Error_code: 1034
2017-04-21 01:29:35 93551 [Warning] Slave SQL: … The slave coordinator and worker threads are stopped, possibly leaving data in inconsistent state. A restart should restore consistency automatically, although using non-transactional storage for data or info tables or DDL queries could lead to problems. In such cases you have to examine your data (see documentation for details). Error_code: 1756

报错信息如上,日志提示空间不够,df -h 确认 MySQL datadir 所在磁盘空间是足够的。后确认是修改表定义需新建临时表,临时表目录为 my.cnf 设置中 temdir 的路径(默认为 /tmp),修改该配置后重启 MySQL 服务,问题解决。

MySQL 配置最基础的主从

Basic Steps in Replication

This chapter will introduce several sophisticated techniques for maximizing the effi‐ ciency and value of replication, but as a first step, we will set up the simple replication shown in Figure 3-1—a single instance of replication from a master to a slave. This does not require any knowledge of the internal architecture or execution details of the rep‐ lication process (we’ll explore these before we take on more complicated scenarios).

Setting up basic replication can be summarized in three easy steps:

  1. Configure one server to be a master.
  2. Configure one server to be a slave.
  3. Connect the slave to the master.

Unless you plan replication from the start and include the right configuration options in the my.cnf files, you will have to restart each server to carry out steps 1 and 2.

To follow the procedures in this section, it is easiest if you have a shell account on the machine with privileges to change the my.cnf file as well as an account on the server with ALL privileges granted.1

You should be very restrictive in granting privileges in a production environment. For precise guidelines, consult “Privileges for the User Configuring Replication” on page 27.

Configuring the Master

To configure a server so that it can act as master, ensure the server has an active binary log and a unique server ID. We will examine the binary log in greater detail later, but for now it is sufficient to say that it keeps a record of all the changes the master has made so that they can be repeated on the slave. The server ID is used to distinguish two servers from each other. To set up the binary log and server ID, you have to take the server down and add the log-bin, log-bin-index, and server-id options to the my.cnf configuration file as shown in Example 3-1. The added options are in boldface.

Example 3-1. Options added to my.cnf to configure a master

[mysqld]
user = mysql
pid-file = /var/run/mysqld/mysqld.pid
socket = /var/run/mysqld/mysqld.sock 
port = 3306
basedir = /usr
datadir = /var/lib/mysql
tmpdir = /tmp
log-bin = master-bin
log-bin-index = master-bin.index
server-id = 1

The log-bin option gives the base name for all the files created by the binary log (as you will see later, the binary log consists of several files). If you create a filename with an extension to log-bin, the extension will be ignored and only the file’s base name will be used (i.e., the name without the extension).

1. On Windows, the command-line prompt (CMD) or PowerShell can be used in place of the Unix “shell.” Basic Steps in Replication | 25

The log-bin-index option gives the name of the binary log index file, which keeps a list of all binlog files.

Strictly speaking, it is not necessary to give a name in the log-bin option. The default value is hostname-bin. The value for hostname is taken from the option for pid-file, which by default is the name of the host (as given by the gethostname(2) system call). If an administrator later changes the machine’s hostname, the binlog files will change names as well, but they will be tracked correctly in the index file. However, it is a good idea to create a name that is unique for the MySQL server and not tied to the machine the server is running on because it can be confusing to work with a series of binlog files that suddenly change name midstream.

If no value is provided for log-bin-index, the default value will be the same base name as for the binlog files (hostname-bin if you don’t give a default for log-bin). This means that if you do not provide a value for log-bin-index, the index file will change its name when you change the name of the host. So if you change the name of the host and start the server, it will not find the index file and therefore assume that it does not exist, and this will give you an empty binary log.

Each server is identified by a unique server ID, so if a slave connects to the master and has the same server-id as the master, an error will be generated indicating that the master and the slave have the same server ID.

Once you have added the options to the configuration file, start the server again and finish its configuration by adding a replication user.

After you make the change to the master’s configuration file, restart the master for the changes to take effect.

The slave initiates a normal client connection to the master and requests the master to send all changes to it. For the slave to connect, a user with special replication privileges is required on the master. Example 3-2 shows a standard mysql client session on the master server, with commands that add a new user account and give it the proper privilege.

Example 3-2. Creating a replication user on the master

GRANT REPLICATION SLAVE ON *.* TO repl_user IDENTIFIED BY 'xyzzy';

There is nothing special about the REPLICATION SLAVE privilege except that the user can retrieve the binary log from the master. It is perfectly viable to have a normal user account and grant that user the REPLICATION SLAVE privilege. It is, however, a good idea to keep the replication slave user separate from the other users. If you do that, you can remove the user if you need to disallow certain slaves from connecting later.

Configuring the Slave

After configuring the master, you must configure the slave. As with the master server, you need to assign each slave a unique server ID. You may also want to consider adding the names of the relay log and the relay log index files to the my.cnf file (we will discuss the relay log in more detail in “Replication Architecture Basics” on page 228) using the options relay-log and relay-log-index. The recommended configuration options are given in Example 3-3, with the added options highlighted.

Example 3-3. Options added to my.cnf to configure a slave

[mysqld]
user = mysql
pid-file = /var/run/mysqld/mysqld.pid socket = /var/run/mysqld/mysqld.sock port = 3306
basedir = /usr
datadir = /var/lib/mysql
tmpdir = /tmp
server-id = 2
relay-log-index = slave-relay-bin.index relay-log = slave-relay-bin

Like the log-bin and log-bin-index options, the defaults for the relay-log and relay-log-index options depend on the hostname. The default for relay-log is host name-relay-bin and the default for relay-log-index is hostname-relay-bin.index. Using the default introduces a problem in that if the hostname of the server changes, it will not find the relay log index file and will assume there is nothing in the relay logfiles.

After editing the my.cnf file, restart the slave server for the changes to take effect.

Connecting the Master and Slave

Now you can perform the final step in setting up basic replication: directing the slave to the master so that it knows where to replicate from. To do this, you need four pieces of information about the master:

  • A hostname
  • A port number
  • A user account on the master with replication slave privileges
  • A password for the user account

You already created a user account with the right privileges and a password when con‐ figuring the master. The hostname is given by the operating system and can’t be con‐ figured in the my.cnf file, but the port number can be assigned in my.cnf (if you do not supply a port number, the default value of 3306 will be used). The final two steps nec‐ essary to get replication up and running are to direct the slave to the master using the CHANGE MASTER TO command and then start replication using START SLAVE:

CHANGE MASTER TO
 MASTER_HOST = 'master-1',
 MASTER_PORT = 3306,
 MASTER_USER = 'repl_user',
 MASTER_PASSWORD = 'xyzzy';
-- Query OK, 0 rows affected (0.00 sec)

START SLAVE;
-- Query OK, 0 rows affected (0.15 sec)


Congratulations! You have now set up your first replication between a master and a slave! If you make some changes to the database on the master, such as adding new tables and filling them in, you will find that they are replicated to the slave. Try it out! Create a test database (if you do not already have one), create some tables, and add some data to the tables to see that the changes replicate over to the slave.

Observe that either a hostname or an IP address can be given to the MASTER_HOST parameter. If a hostname is given, the IP address for the hostname is retrieved by calling gethostname(3), which, depending on your configuration, could mean resolving the hostname using a DNS lookup. The steps for configuring such lookups are beyond the scope of this book.


摘选自:《MySQL High Availability》 p25-p29

分享一个 MySQL 分库分表类

当一个表数据记录过大时就会出现性能瓶颈,而一般对应的解决办法是要么做分区表,要么分表,分区表就不说了,分表又分为垂直分割和水平分割,具体区别请自行搜索。一般而言,分库分表属于水平分割,按照一定的规则将数据插入到不同的表中去。而分库则可以很方便的转移数据库的压力,比如将一个很大库的分别放在不同的服务器上。

下面是我写的一个分库分表的实现:

<?php
/**
 * User: jing.liu
 * Date: 14-8-12
 * Time: 下午3:16
 */

namespace App\Model\Database;

class Config
{
    public $dsn;
    public $user;
    public $password;
    /**
     * @var string 分库分表后得到的数据库名
     */
    public $dbname;
    /**
     * @var string 分库分表后得到的表名
     */
    public $table;

    /**
     * @var array MySQL 配置数组
     */
    private static $config;

    /**
     * @var string 配置文件路径
     */
    private static $configFile = 'mysql.php';

    public function __construct($dbname, $table, $id = 0)
    {
        if (is_null(static::$config)) {
            $config = include(static::$configFile);
            static::$config = $config;
        }

        $config = static::$config;
        if (isset($config['shared']) && isset($config['shared'][$dbname])) {
            $dbconfig = $config['shared'][$dbname];
            $id = is_numeric($id) ? (int)$id : crc32($id);
            $database_id = ($id / $dbconfig['database_split'][0]) % $dbconfig['database_split'][1];
            $table_id = ($id / $dbconfig['table_split'][0]) % $dbconfig['table_split'][1];

            foreach ($dbconfig['host'] as $key => $conf) {
                list($from, $to) = explode('-', $key);
                if ($from <= $database_id && $database_id <= $to) {
                    $the_config = $conf;
                }
            }

            $this->dbname = $dbname . '_' . $database_id;
            $this->table = $table . '_' . $table_id;
        } else {
            $this->dbname = $dbname;
            $this->table = $table;
            $the_config = $config['db'][$dbname];
        }
        $c = $the_config;
        if (isset($c['unix_socket']) && $c['unix_socket']) {
            $this->dsn = sprintf('mysql:dbname=%s;unix_socket=%s', $this->dbname, $c['unix_socket']);
        } else {
            $this->dsn = sprintf('mysql:dbname=%s;host=%s;port=%s', $this->dbname, $c['host'], $c['port']);
        }
        $this->user = $c['user'];
        $this->password = $c['password'];
    }

}

Config 类就做一个事情,根据配置文件,去拿到对应的库和表的链接配置,然后客户可以根据 dsn 去链接对应的数据库。对应的配置文件如下:

<?php
/**
 * User: jing.liu
 * Date: 14-8-6
 * Time: 上午11:19
 */

$default = array(
    'unix_socket' => null,
    'host' => 'localhost',
    'port' => '3306',
    'user' => 'root',
    'password' => '',
);

$config = array(
    // 不进行分库分表的数据库
    'db' => array(
        'my_site' => $default,
    ),
    // 分库分表
    'shared' => array(
        'user' => array(
            'host' => array(
                /**
                 * 编号为 0 到 10 的库使用的链接配置
                 */
                '0-10' => $default,
                /**
                 * 编号为 11 到 28 的库使用的链接配置
                 */
                '11-28' => $default,
                /**
                 * 编号为 29 到 99 的库使用的链接配置
                 */
                '29-99' => $default,

            ),

            // 分库分表规则
            /**
             * 下面的配置对应百库百表
             * 如果根据 uid 进行分表,假设 uid 为 543234678,对应的库表为:
             *  (543234678 / 1) % 100 = 78 为编号为 78 的库
             *  (543234678 / 100) % 100 = 46 为编号为 46 的表
             */
            'database_split' => array(1, 100),
            'table_split' => array(100, 100),
        ),
    ),
);


return $config;

给出一个使用这个分库分表的例子:

<?php
/**
 * User: jing.liu
 * Date: 14-8-6
 * Time: 上午10:23
 */

namespace App\Model;

use App\Model\Database\Config;
use \PDO;

abstract class Model
{
    /**
     * @var Config
     */
    public $config;

    /**
     * @var PDO
     */
    public $connection;

    protected $dbnamePrefix;
    protected $tablePrefix;

    /**
     * @var string 分库分表后对应的表
     */
    protected $table;

    public function __construct($id)
    {
        $this->config = new Config($this->dbnamePrefix, $this->tablePrefix, $id);
        $this->connection = new Pdo($this->config->dsn, $this->config->user, $this->config->password);
        $this->table = $this->config->table;
    }

    public function update(array $data, array $where = array())
    {

    }

    public function select(array $where)
    {

    }

    public function insert(array $data)
    {

    }

    public function query($sql)
    {
        return $this->connection->query($sql);
    }
}

下面这个例子展示了如何使用上述的 Model 类:

<?php
/**
 * User: jing.liu
 * Date: 14-8-12
 * Time: 下午4:06
 */

require 'Config.php';
require 'Model.php';

use App\Model\Model;

class User extends Model
{
    protected $dbnamePrefix = 'user';
    protected $tablePrefix = 'userinfo';
}

$user = new User(4455345345);

print_r($user);

如果看官您有任何疑问或者有更好的实现,欢迎交流~

MySQL 整数类型指定宽度

MySQL 中可以为整数类型指定宽度,例如有如下表:

CREATE TABLE `tmp01160800` (
  `id` int(10) unsigned NOT NULL AUTO_INCREMENT,
  `is_enable` tinyint(1) unsigned NOT NULL DEFAULT '0',
  PRIMARY KEY (`id`),
  KEY `is_enable` (`is_enable`)
) ENGINE=InnoDB DEFAULT CHARSET=utf8

is_enable 字段显然只需要显示 0 或者 1,可能在应用逻辑中表示这个用户是否激活等,因此我们给其类型为 tinyint,并且指定其宽度 1。最初我以为 tinyint(1) 只能存储 0 到 9 的值,后来发现插入 10、99、125 等值都可以。实际上 tinyint 存储范围是 -128~127,刚好是 8 位 1 字节所能表示的整形范围,tinyint unsigned 的存储范围则是 0~255。所以指定整数宽度对应用来说意义不大,不管你指定多宽,实际上可以存储的范围是一样的。

下面文字来自《高性能 MySQL》一书:

MySQL 可以为整形类型指定宽度,例如INT(11),对大多数应用来说这是没有意义的:它不会限制值的合法范围,只是规定了 MySQL 的一些交互工具(例如 MySQL 命令行客户端)用来显示字符的个数。对于存储和计算来说,INT(1) 和 INT(20) 是相同的。

MySQL 建表出现 1064 错误

几乎没有手写过建表语句的人今天想建一个表将一个 csv 文件导入进行分析,SQL 写好了,运行出现错误码 1064, 但是没有文字描述错在哪里,为了分析错误原因,将字段改为最简单的形式,还是出错:

create table table_name (
    id unsigned int not null auto_increment,
    name varchar(20), 
    primary key (id)
) default charset utf8

错误信息如下:

#1064 – You have an error in your SQL syntax; check the manual that corresponds to your MySQL server version for the right syntax to use near ‘unsigned int not null auto_increment, name varchar(20), primary key (‘ at line 2

看了半天不知道错在哪里了,叫室友帮忙看一眼,他说,unsigned 应该在 int 后面啊,我试了一下,果然成功运行。

更改后的 SQL 如下:

create table table_name (
    id int unsigned not null auto_increment,
    name varchar(20), 
    primary key (id)
) default charset utf8

无符号整形不应该是 unsigned int 吗? C 语言就是这样定义的啊,额~

MySQL JOIN 用法示例详解

本文将图文并茂的讲解 MySQL 的查询时 JOIN 的用法。这里用到的两个示例表及示例数据如下:

CREATE TABLE `user` (
  `id` int(10) unsigned NOT NULL AUTO_INCREMENT,
  `email` varchar(255) NOT NULL,
  `name` varchar(255) NOT NULL,
  PRIMARY KEY (`id`),
  UNIQUE KEY `users_email_unique` (`email`)
) ENGINE=InnoDB DEFAULT CHARSET=utf8;

INSERT INTO `user` VALUES (1,'xiaoming@qq.com','小明'),(2,'xiaowang@qq.com','小王'),(6,'xiangzhang@qq.com','小张'),(7,'xiaoli@qq.com','小李');

CREATE TABLE `user_info` (
  `user_id` int(10) NOT NULL,
  `age` int(10) NOT NULL,
  `name` varchar(255) NOT NULL,
  PRIMARY KEY (`user_id`)
) ENGINE=InnoDB DEFAULT CHARSET=utf8;

INSERT INTO `user_info` VALUES (1,22,'小明'),(2,21,'小王'),(3,33,'小郑');

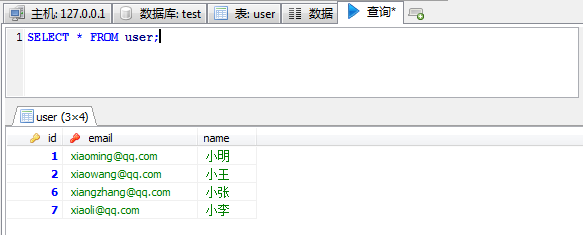
插入数据库后数据如下:

user_datauser_info_data

MySQL 官网上介绍 JOIN 一共有以下几种形式,接下来笔者将一一介绍:

table_reference [INNER | CROSS] JOIN table_factor [join_condition]
  | table_reference STRAIGHT_JOIN table_factor
  | table_reference STRAIGHT_JOIN table_factor ON conditional_expr
  | table_reference {LEFT|RIGHT} [OUTER] JOIN table_reference join_condition
  | table_reference NATURAL [{LEFT|RIGHT} [OUTER]] JOIN table_factor

JOIN、CROSS JOIN、INNER JOIN

MySQL 官网说:In MySQL, JOIN, CROSS JOIN, and INNER JOIN are syntactic equivalents (they can replace each other). JOIN, CROSS JOIN, 和 INNER JOIN 是等价的,可以相互替换。下面的例子不再出现 CROSS JOIN 和 INNER JOIN。

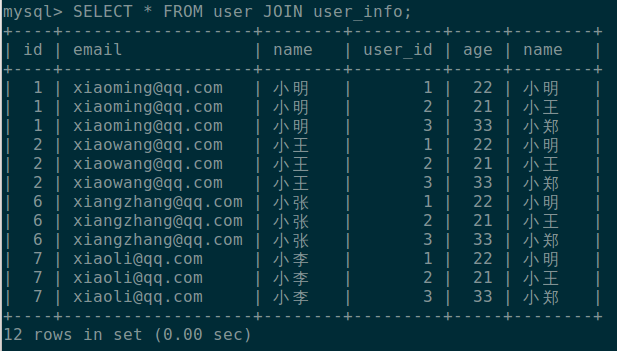
直接使用 JOIN 连接两个表查询得到结果为:

snapshot1

可以看到,两表结果进行了笛卡尔积,最终查出 12 行记录。这是没带任何条件的查询,这条语句等价于:

SELECT * FROM user, user_info

MySQL 官网如是说:

INNER JOIN and , (comma) are semantically equivalent in the absence of a join condition: both produce a Cartesian product between the specified tables (that is, each and every row in the first table is joined to each and every row in the second table).

说的是,在没有条件的情况下,INNER JOIN 和 ,(逗号)是等价的,都返回两张表的笛卡尔积。
我们来试试带条件的 JOIN 查询:

snapshot2
这个结果很清晰,连接的条件是 user.id=user_info.user_id。结果返回两行记录。

USING

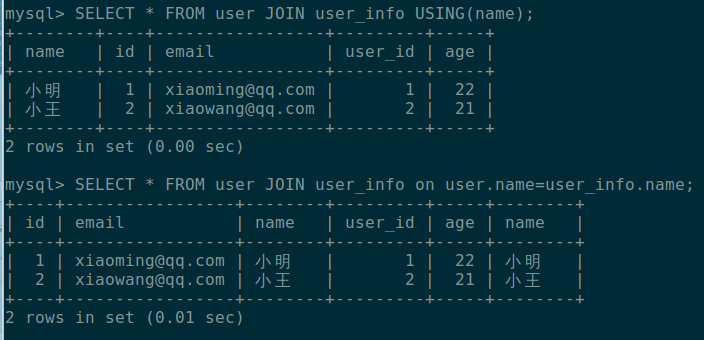
我们来看看 USING 的用法:

snapshot3

USING(name) 等价于 ON user.name=user_info.name,但是大家请注意,这里有一点点区别,使用 USING 得到的结果只有一个 name 字段,且 name 字段在结果最前面,而使用 ON 得到的结果有两个 name 字段。

我们再试试使用 USING 去查并不是两张表都有的字段:

snapshot4

提示错误,因为 user_info 表里并没有 id 字段。

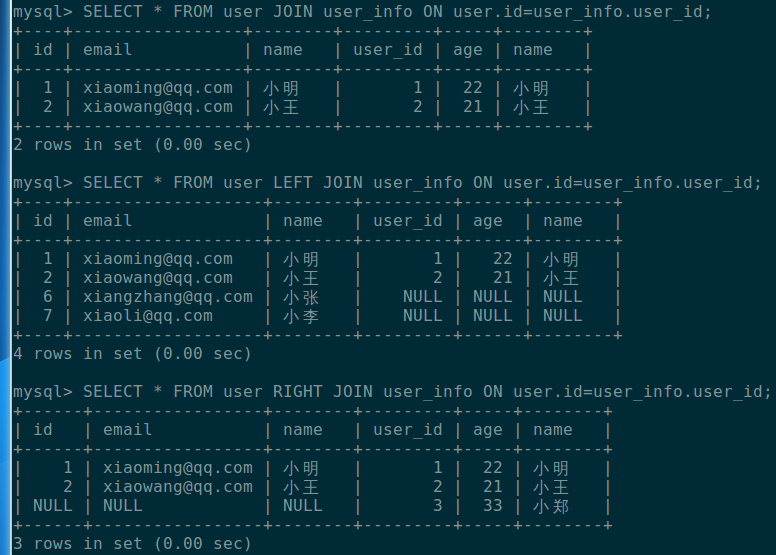
JOIN 与 LEFT JOIN 和 RIGHT JOIN

snapshot6

在 LEFT JOIN 里面,如果右边的表里没有匹配左边表的记录,则右边表所有字段为 NULL;同理,在 RIGHT JOIN 里面,如果左边的表里没有匹配右边表的记录,则左边表所有字段为 NULL;而 JOIN 只查询出两张表都存在的数据。

利用 LEFT JOIN 可以查出左边表存在而右边表不存在的记录,如下图:

snapshot7

STRAIGHT_JOIN

STRAIGHT_JOIN 和 JOIN 一样,除了前者可以保证左边的表先查。STRAIGHT_JOIN 可以用在防止 JOIN 优化器将表的顺序搞错。

NATURAL

NATURAL JOIN 等价于使用 USING,它会 USING 所有两张表里都包含的字段:

snapshot8

OUTER

至于这货,笔者也没搞明白是干什么的。官网给出的实例讲的是用在 ODBC 里,笔者没看明白。

上面所有的示例都只演示了两张表 JOIN,可不要以为只能两张表进行 JOIN 查询。一下是一些 SQL 示例:

SELECT * FROM t1, t2, t3;
SELECT * FROM t1 LEFT JOIN (t2 CROSS JOIN t3 CROSS JOIN t4)
                 ON (t2.a=t1.a AND t3.b=t1.b AND t4.c=t1.c);

ps:大家有没有发现 wordpress 写作时,编辑器用得很不爽啊,比如,插入代码后想回到正常编辑必须切换到文本模式下,在 </pre> 标签后先打几个字符然后在回可视化模式正常写作。还有,每次发文章都要跑到后台来,没有直接用 markdown 舒服啊,直接本地写好,提交上去,多方便。